
Your swamp cooler has performed beautifully this summer, and you want it to last for years to come. Since temperature changes or standing water can ruin your swamp cooler when it’s not in use, you may be wondering how to drain all the water from your evaporative cooler. We’ve done all the groundwork for you and have the answers here.
To drain the water from your swamp/evaporative cooler:
- Turn off the power and the water supply, and open the overflow/drain plug at the bottom of the reservoir pan by
- Holding the screw-nut underneath with a pair of pliers
- Twisting the screw in the opposite direction with your other hand
The evaporative cooler system depends on water, and you don’t want to leave standing water in the system to freeze or stagnate over the winter. So proceed to the detailed discussion below to get in-depth instructions and understand how to drain the water from your evaporative/swamp cooler.
Draining The Cooler - Why?
The evaporative cooler also goes by the name ‘swamp’ cooler, but whatever you like to call it, they both work by blowing air through a pad of water to create an evaporative effect that cools the air. But when your cooler is not in use, standing water can stagnate and create unhealthy mold and mildew throughout the system. And if you live in an extreme climate, freezing temperatures can cause water to expand and crack the parts of your water cooler.
Draining the cooler - how?
The most important thing you can do for your cooler is to remove the water when it’s not in use to avoid the above problems. To do this, perform the steps below.
Turn off the power
- Turn off the power to the unit.
- At the unit itself - a plug and outlet is usually under the unit; or
- At the electrical breaker box - turn off the correct breaker
Now, turn off the water supply.
How do I turn off the water to my swamp cooler?
- Locate the water supply to the unit; there are many places this can be located. If you don’t know where it is, search all of your water supply faucets for anything that looks like a secondary faucet with a small metal or plastic hose leading away. This can be located in various places.
- At the hose faucet
- Under an indoor sink
- In a basement
- Near the unit
- When you’ve located the correct supply, turn the handle or knob so that water is no longer being supplied to that hose.
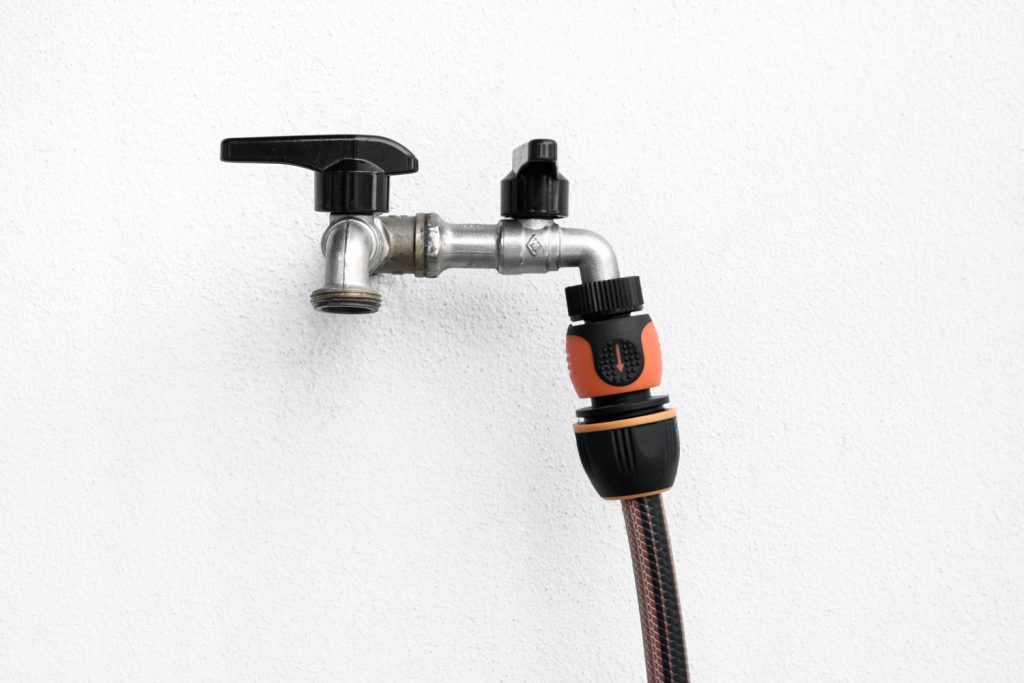
This is a common water supply from an outdoor faucet. You can see that the additional valve with the hose can be turned off without affecting the main faucet water suppl
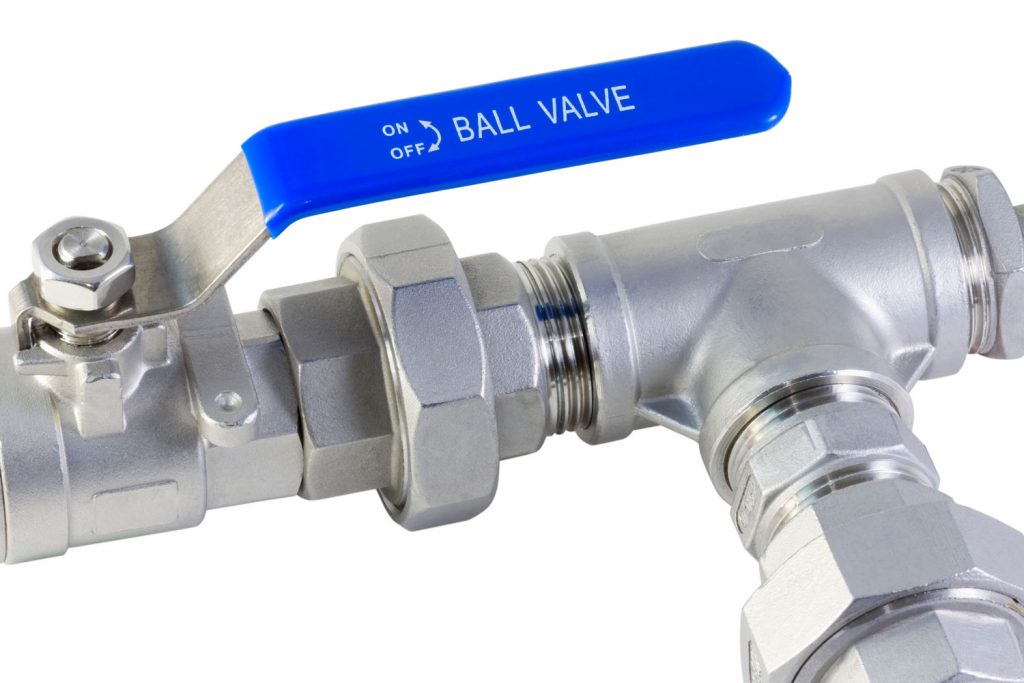
On a ball valve, the water is ON when the valve handle is aligned with the pipe (as in the picture). To stop the water supply, move the handle until it stops. This is usually at a 90-degree angle to the pipe.
- ‘Righty-tighty, Lefty-loosey’ is the phrase to remember so that you know which way to loosen or tighten screws, especially standard water-faucet shut-off valves.
Drain the water from the reservoir tank
Now that you’ve turned off both the water and the power, it’s time to drain the water from the reservoir, or holding, pan. To do this, you’ll need a couple of adjustable wrenches or pliers.
- Locate the drain-plug/overflow tube inside the reservoir pan.
- Underneath the pan, at the bottom of the plug, locate the screw-nut attached to that plug.
- Attach the wrench securely to the screw-nut.
- Hold the screw-nut in place underneath, and twist the drain plug at the top.
- For extra grip, wrap a few rubber bands around the screw before turning. You want to avoid using a wrench on the screw to ruin the threads (the grooves) and cause leaks.
- Remember that the screw-nut is tightened by turning to the right and loosened by turning to the left. Turn the actual screw the opposite way.
The drain plug should come loose, and the water will drain away.

This wrench is both adjustable and locks in place, great for anyone who needs a solid hold without needing the strength of Hercules.
After you’ve drained the reservoir, it’s also essential to remove water from the line that brings water to the cooler.
How to drain the swamp cooler line
To drain the swamp cooler line, you want to disconnect the end of the hose at the lowest point; this is usually at or near the water supply itself.
- If you have an outdoor hose hooked up to your cooler, unscrew it at the faucet and allow the water to drain out.
- If you have a drain valve, turn the valve to the open position and allow the water to drain into a bucket or container.
This video shows a swamp cooler line that has been fitted with a T-valve. When the line needs to be drained, the T-valve eliminates unscrewing - and possibly damaging - the fittings that keep the supply water-tight.
https://www.youtube.com/watch?app=desktop&v=VSziqa0I5zk
A few more questions that you may be wondering about are answered here. One of the most common questions is:
Is it normal for a swamp cooler to leak water?
Although your swamp cooler should absolutely NOT leak, there are a couple of circumstances where water may seem to leak out of your cooler, but they are a normal part of operations or a simple adjustment.
Your water cooler has a purge-pump
If you have a purge pump, it will periodically replace the water in the reservoir. It ‘dumps’ the old water through the overflow/drain plug. This may cause the illusion that the cooler is leaking.
Your water cooler float valve may be too high
If your float valve is too high, too much water may enter the reservoir and drain out of the overflow/drain plug. This does not mean there is a leak in your cooler, just that you need to adjust the float valve.
Do this by bending the wire arm of the float valve to adjust the water level so that it is about 1/4 to 1/2 an inch below the top of the overflow/drain plug.
Do you have to put water in a swamp cooler?
A swamp cooler needs to have water in the reservoir before the pump is turned on; otherwise, the water pump can burn out. There are two types of coolers - portable and fixed - and if you can’t find the manufacturer's directions about filling the reservoir with water, use these guidelines.
Fixed Evaporative/Swamp Cooler
- Water supply comes from a faucet that you control manually. Turn on the water and allow lines/reservoir to fill before turning on the power.
- Water supply is turned on via a switch on the unit. Turn on the water supply switch for the recommended time before turning on the power.
Portable Evaporative/Swamp Cooler
- Water Supply must be manually filled. Fill the reservoir regularly - many portable units will automatically shut off when the water supply is consumed.
- Water supply comes from a hose faucet. These larger portable units usually require a constant water supply. Hook up the hose and turn on the water, allow the reservoir to fill before turning on the power.
Final Thoughts
Now you have a clear understanding of how to drain your swamp/evaporative cooler. You can usually do it yourself if the unit is attached to a window, but you may need additional help or a professional if your unit is located on the roof.
Be sure to drain both the reservoir and the water supply line if you are winterizing to avoid damage. Your water cooler should not leak. If it does, your unit may have a purge pump, or your float valve is incorrectly adjusted. With proper maintenance, your swamp cooler should give you cool air for years to come!
For additional questions or concerns about your swamp cooler, see Swamp Cooler Spraying Water – What To Do? and Swamp Cooler Smells Like Fish – What To Do?