
You are aware that you will be embracing the cold breeze of winter in your north-facing room. With this, you need your living space to be insulated to maintain the level of comfort you and your family deserves. For your convenience, we have researched to give you helpful guides on how to go about the process.
To insulate your north-facing room, you can choose between insulating the inside or the outside wall.
- Internal wall insulation involves using rigid insulation boards or stud wall insulation.
- External wall insulation involves setting up a layer of insulation material and then cover with render or cladding.
Typically, north-facing rooms are associated with cold interior walls. Most of the year, the room's walls feel cold to the touch. This post will discuss insulating the cold wall and all other pertinent details, each with its advantages and drawbacks. Stay on this page as we discuss more on north-facing rooms.

What Does it Mean if Room is North Facing?
As the name suggests, a room is said to be north-facing when its entryways, the door, and most of its windows, are oriented to the North. Also, it could include a significant portion of the room's wall.
Of all the four orientations, north-facing rooms receive the least natural lighting. The room will unlikely have light coming in regardless of the time of the day, even with large windows.
A common phenomenon is that air, with the direction coming from the North pole, will continuously blow into the room, which is undoubtedly cold. Due to this, it is not surprising that homeowners complain that some of their rooms are colder than other rooms, even during summer.

If you feel cold air even during summer in your north-facing room, how could you imagine the freezing temperature of winter? How could you maintain comfort even with these extreme room temperatures? The circulating cold air gets more evident as you touch the room's walls.
It is in this perspective that your north-facing room needs to be insulated.
Meanwhile, you might be interested to read our related posts on insulation:
Does Insulation Help with Cooling?
How to Insulate Your Cold Wall
Insulating your north-facing room is done through the walls. It could be from the inside or outside, that is, the exterior wall. We will discuss each type below.
Internal Wall Insulation
You can choose between rigid insulation boards and stud walls when insulating walls from the inside.
Rigid insulation boards are foam sheathing that is best known for moisture control. It comes in rolls or 4 x 8 feet sheets and 1/4 to 2 inches in thickness. The wall should first be leveled by applying plaster or render before fitting the boards.
Would you know where to buy rigid foam insulation? Here is the answer.

Check out this foam insulation on Amazon.
Stud wall insulation involves a stud work frame made of metal or wood attached to the wall studs. Then, mineral wool fiber, insulation batts, or foam spray is filled in between the vertical lumber. After filling in, it is covered with plasterboard and ready to be redecorated.
Stuffing insulation into the stud frame may prove inferior compared to the effectivity of rigid insulation boards. The filling material should be 120mm or more in thickness, thus further reducing the room area.
A stud wall has a sturdy and stable frame that can hold heavy attachments of kitchen appliances.
Instead of a plasterboard cover, a rigid insulation board can be used instead for more effective insulation.
Unlike rigid insulation boards, stud wall is perfect for uneven wall surfaces.
Installation Steps
Here are the steps to install insulation from the inside wall. First and foremost, you need to do the necessary preparations before installation proper.
- With the insulation materials, prepare the tools for cutting, positioning to the wall, and screws and adhesives to secure them in place. Also, a measuring tape is needed.
- Prepare the wall by removing everything that is attached. These include the lighting and any pipework. All appliances and fixtures attached to the wall should likewise be removed.
- Prepare the work area by moving furniture, appliances, and other fixture away from the wall. This gives ample space to move around and properly position and attach insulation materials to the wall.
- Protective personal equipment should come in handy as you are handling health-hazard materials and tools.
- Take precise measurements of the intended wall area, including the joints.
After preparation, here are the steps to install the foam board:
- Cut the foam board with a circular saw, masonry blade, or utility knife according to the wall dimensions.
- Attach to the wall with screws and large washers.
- Use adhesive to adhere the foam board to the wall.
- Caulk the wall joints to prevent air leaks.
For aesthetics, you might be thinking of painting your foam board insulation. Click here to learn more.
Similarly, here are the steps to install stud wall insulation
- Make a frame based on the wall measurements taken.
- Attach the framework to the wall.
- Fill in the spaces between the vertical studs with the chosen insulation material.
- Cover with plasterboard to make a smooth wall finish.
- Reattach the lighting, appliances, and other fixtures, if deemed necessary.
Here is a video to visualize the framing of the wood stud:
Spray foam insulation might be of interest. We have these posts for you:
Can You Do Foam Insulation Yourself? [And How To]
How Much Spray Foam Insulation Do I Need [In Inches]?
External Wall Insulation
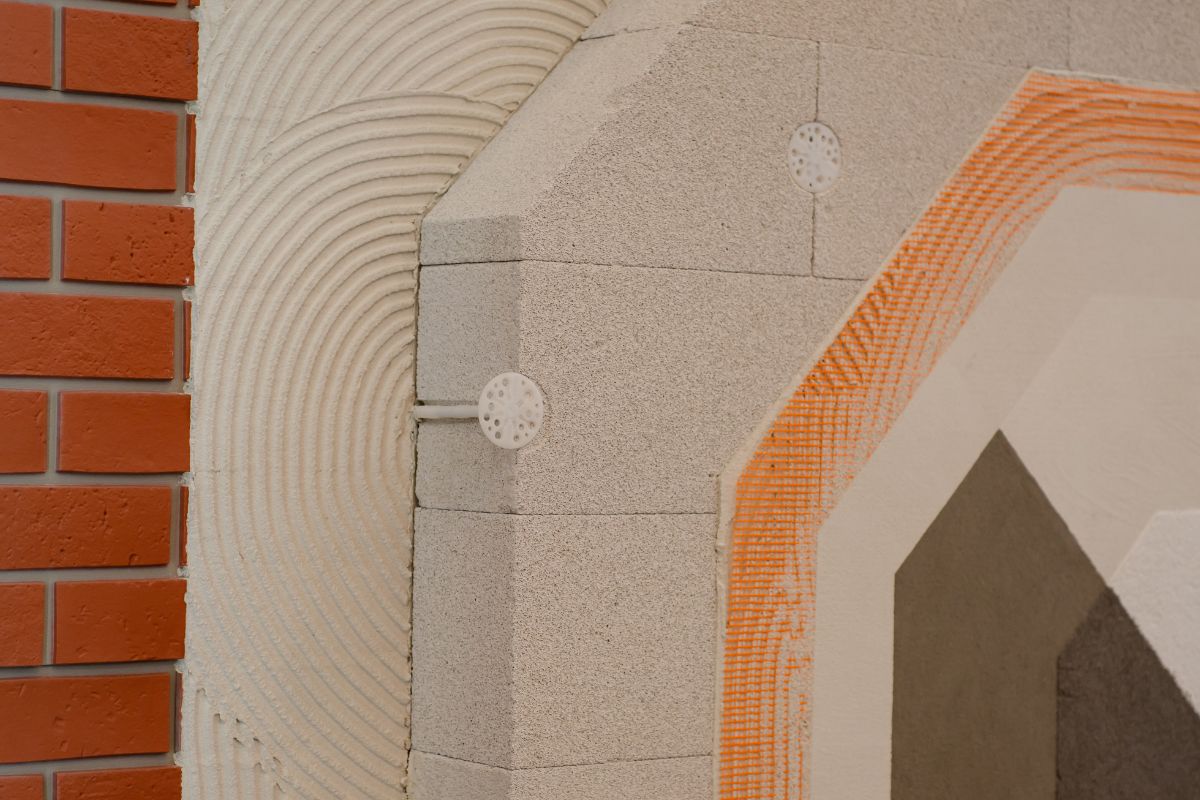
Insulating your cold wall from the outside involves layering an insulation material using mechanical fixings and adhesives. After which, the insulation is covered with protective layers of render or cladding.
The resulting facade of your external wall can be enhanced with cladding. It takes attractive forms such as timber panels, shingles, stone tiles, or brick for a masonry setting.
Render is less expensive than cladding, which consists of sand and cement mixture applied over a wire mesh.
Internal Vs. External Wall Insulation
Choosing between internal and external wall installation depends on your home's requirements, personal preferences, and budget. By weighing the factors side by side, you could make an informed choice for your insulation project. Here are the pros and cons of each type:
Pros of Internal Wall Installation
- installation is easy and can be your DIY project
- cost of materials and installation is relatively cheaper
- could be disruptive, but it could be done room by room
- walls can be redecorated after installation
Cons of Internal Wall Installation
- disrupts household activities
- added work of plastering or rendering if the wall is not level
- decreases floor space depending on the thickness of the insulation material
- requires door frames and other external fittings to be removed and reattached
- heavy fittings may be hard to reattach to the walls, though special fixings are commercially available
Pros of External Wall Installation
- no disruption to the household
- no reduction in floor area of the interior
- improves the appearance of the house's exterior
- improves waterproofing and sound resistance of the wall
- fills cracks and gaps in the wall, which can reduce draughts
- increases the lifespan and durability of your wall
- reduces condensation inside the walls to prevent damp
- best installed during house remodeling to reduce costs
- escalates property value
Cons of External Wall Installation
- requires a higher budget outlay for the whole project
- unless you are a DIY expert, the project needs professional installers
- requires good access to the outer wall, which could be an added project task
- external pipework, lighting, and other wall attachments are removed, which could be an added project task
- not recommended if the outer wall isn't structurally sound
- requires legal permit
Why is North Facing Homes Popular?

North-facing homes have increasingly become the popular choice among home designers and homeowners alike. This is because houses that are designed to have a north orientation would normally receive the most direct sunlight at the back.
Residential houses, especially in the upscale neighborhood, typically design their homes such that areas where guests are entertained, such as the patio, lanai, deck, gazebo, and indoor garden, are situated at the back. These are the living spaces that people frequent. Hence, good daylight is expected most of the day and throughout the year.
Homeowners prefer a house design where the family room and other main living spaces are oriented at the back for security and privacy. Rooms at the back take advantage of the sun where it is wanted while avoiding overheating and glare.
Also, there is more flexibility in terms of construction materials and home design for houses facing North. It is because the materials enjoy less wear and tear from harmful UV rays and are less rigid since they aren’t exposed to the intense heat of the sun.
Another important advantage, economics-wise, is the reduced energy bills. The temperature shoots up during summer, but north-facing homes enjoy a cool breeze despite the heat of the summer months.
Disadvantages of North Facing Rooms
In places with colder climates, north-facing rooms present a poor choice. Here are a few points to note:
- An overall gloomy ambiance since natural lighting is less at any time of the day.
- High energy bills due to frequent use of heaters
- High incidence of mold and mildew, drafts, and condensation of walls
- Dampens the vibrant spirit of the occupants due to a less than bright atmosphere

However, the above drawbacks can be offset by other means, such as a house design with more south-facing windows.
Final Thoughts

To maintain comfort in your living spaces, insulate your north-facing rooms. You have a choice between internal and external wall insulation, depending on your needs and preferences. Each choice has its benefits and drawbacks, so take your pick!
North-facing homes have become popular in modern home design. Main living spaces were designed facing the rear house' layout, where homeowners enjoy the most sunlight throughout the year.