
Your radon fan should help reduce toxicity brought by that natural-occurring gas. But over time, this machine may begin to malfunction or refuses to function at all. Now, you’re wondering what the DIY steps are to replace a radon fan. We researched this concern for you and found the following information.
Start the process of replacing your radon fan by preparing for the task. Gather the materials and tools for the job, like the ideal replacement radon fan that fits your specific requirements. Once prepared, follow these steps:
- Turn off the fan
- Disconnect the wires
- Remove the old fan
- Place the new fan
- Wire the new fan
- Turn on the new radon fan
Although this replacement task may not require extensive know-how of how radon fans work, you may still make mistakes if you don’t follow the correct steps. So continue reading as we talk about this procedure in greater detail and help you avoid those costly mishaps.
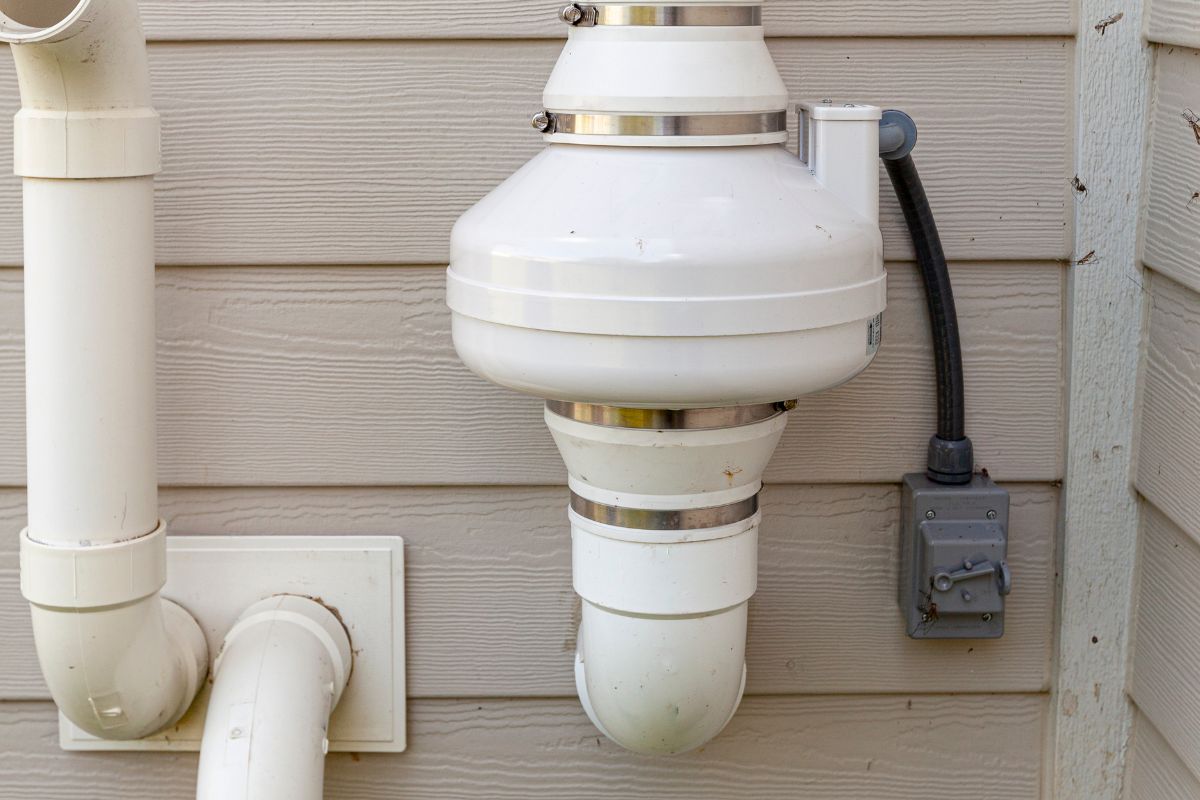
![PVC pipes attached to the electrical motor of a residential radon mitigation system, How To Replace A Radon Fan [Step By Step Guide]](https://hvacseer.com/wp-content/uploads/2022/10/PVC-pipes-attached-to-the-electrical-motor-of-a-residential-radon-mitigation-system.-TIt-sucks-radon-rich-basement-ground-air-and-removes-it-from-the.png)
Is It Easy To Replace Your Radon Fan?
Replacing a radon fan is usually a DIY-friendly job. But proper preparation and follow-through are still vital elements to the task’s successful completion. Plus, you can avoid $1,000 in professional radon fan replacement costs by using DIY techniques.
DIY Instruction To Replace Your Radon Fan

As mentioned previously, preparation is one of the key factors in replacing a radon fan. Putting together the equipment and materials needed, along with ensuring that the workspace is safe, helps reduce the risks of errors.
Here are some preparatory measures you need to follow before and during the replacement process:
- Seals gaps and holes first. Repairing imperfections around the radon fan installation location can help reduce elevated gas levels.
- Be flexible, but accurate. For example, if you can’t create a large hole because you don’t have a large drill bit, you can instead make multiple small holes in the marked area to create the large opening.
- Measure the piping. Document the measurements of the pipes needed for the installation to avoid making repeated trips to the hardware store.
- Be patient. Some materials, such as sealants, take a reasonable amount of time to dry and cure. Hurrying the curing process may result in unsatisfactory results.
- Practice safety always. Wear protective gear, such as gloves, goggles, and a respirator, to prevent direct contact with harmful substances.
The next step is to gather the materials and tools needed for the operation.
Things You’ll Need
Once you have all the equipment and materials needed for this radon fan replacement job, move forward with this process by following these steps:
Step-By-Step Guide
Step #1: Turn Off The Fan
Disconnect the radon fan from its connected power source. You may use the disconnect switch of the fixture if it comes with one. Then, leave the fan for a few minutes to allow for the blades to stop spinning completely.
Tip: You can also turn off the circuit breaker connected to the radon fan to ensure no power goes into the fixture. Read our post on the relationship between a radon fan and a dedicated circuit to know if this fixture needs an exclusive circuit breaker.
Step #2: Disconnect The Wires
Remove the screws securing the cover of the fan’s electronics module using the Philips screwdriver. Next, disconnect the newly exposed wiring carefully.
You may need to use the flathead screwdriver to loosen some of the electrical connections inside the container. Now, with the wires loose, pull them out of the nearby hole.
Step #3: Remove The Old Fan
Use the 5/16th nut driver to remove the fasteners securing the rubber couplers that are on the top and bottom of the fan. Once removed, disconnect the couplers’ connections from the fan. At this point, you can remove the old fan from its mount.
Tip: You can clean the rubber couplers during this step. Clean couplers can help make the new radon fan installation easier than expected.
Step #4: Place The New Fan
Place the new fan in the same location as the old unit. Make sure to follow the correct orientation to avoid encountering problems with the fit down the line. Next, slide the couplers into place and secure them using the nuts you removed from the previous step.
Open the cover of the wiring container of the new fan. Then, insert the wires into the hole. Secure the wiring with the nut that should come with the original installation. Use the flathead screwdriver to tighten the nut if necessary.
Step #5: Wire The New Fan
Take note of the colors of the wires inside the wiring container. Then, connect the black wire to the black-and-red terminal. Next, attach the white wire to the blue terminal.
Once the wires are secure, place them into their brackets in the container. At this point, you can temporarily restore power to the radon fan to check for electrical issues.
If it works properly, turn off the fan again. Then, close the wiring container’s opening with its accompanying cover. Secure the cover by screwing it into place.
Note: You may need a small screwdriver to tighten the wiring connections. This extra step may or may not exist for your specific radon fan model.
Tip: Place a level on top of the wiring container to check if the installation is parallel to the ground. Leveling the radon fan may help prevent the risks of water pooling in the fixture, extending its lifespan.
Step #6: Turn On The New Radon Fan
After closing the wiring container, restore power to the radon fan. Allow the fixture to run for a while. Then, check your property’s radon levels to check if the fan is working as intended.

Check out this radon fan on Amazon.
You can also watch the video below if you need a visual guide for this procedure:
Perhaps you might be encountering a problem where the radon fan keeps tripping the GFCI. Read our post highlighting that concern to learn why this problem is happening and what you can do to fix it.
How Often Should You Replace Your Radon Fan?
Radon fans typically last about 5 years. Some models might last longer than that period, particularly with proper care and maintenance. However, you may need to replace your radon fan immediately if you notice signs like:
- Unknown noises and/or vibrations
- Visible harm to the fan’s housing
- Higher-than-normal radon levels
- The fan is hot to touch
- System cycles without human intervention
At What Level Should You Worry About Radon?
The United States Environmental Protection Agency (EPA) advises properties to have radon levels below 4 picocuries per liter of air (pCi/L). But the ideal radon levels should be a maintained amount of 2 pCi/L. Radon levels higher than 4 pCi/L are causes of concern and promote increased risks of toxicity for people in and around the immediate vicinity.
Contact an industry professional immediately if you or other people nearby experience radon toxicity symptoms like:
- Difficulty breathing
- Wheezing
- Chest pain
- Fatigue
- Unexplained weight loss
- Persistent cough (can also lead to coughing up blood if left unchecked)
How Do I Choose A Radon Fan?
If you don't need to replace your old radon fan immediately, it's important to take the time in choosing the correct model. That way, you can get excellent value out of your new installation.
Some of the factors you need to check out while you’re still in the selection process are:
Type
Radon fans often fall under four different types, which are:
- Power SSD: Ideal to use if the property is still in the construction phase.
- High-flow SSD: Often works by removing the gas from the ground and releasing it into the atmosphere.
- Suction SSD: Has a similar function to a high-flow SSD fan, but can be a good choice for connecting to non-porous materials.
- Room pressurization fan: Suck toxic radon air from a room and release it through a roof vent.
Durability And Lifespan

As mentioned earlier, radon fans often last approximately 5 years. But certain models may last longer than that period, thanks in part to their high-quality builds and excellent performances.
However, these top-tier models may cost more than your standard units. So prepare to spend the extra cash to buy these options if you want to experience that extra peace of mind from radon toxicity.
Airflow Rating
The higher the airflow rating of a radon fan, the better. Generally, you can see the airflow ratings of radon fans measured in the cubic flow per minute (cfm). However, a higher cfm may also translate to more expensive running costs.
Final Thoughts
Radon fan replacement is generally a DIY-friendly jobs, but you still need to prepare for the task to prevent expensive mistakes. Let this guide help you in replacing your old radon fan with a new model to ensure the new unit functions as anticipated.